We remember the first time we sliced into a homemade cheesecake and watched friends’ faces light up. That quiet, shared moment—warm kitchen, cozy music, a slice on a plate—reminded us why we cook: to bring people together with simple, delicious food.
Today, we invite you to make a restaurant-quality Philadelphia cheesecake at home. This Easy Philadelphia Cheesecake Recipe is for home cooks across the United States and the world, whether you’re new to baking or a seasoned weekend chef. We’ll show you how Philadelphia cream cheese creates that signature silky texture and rich flavor.
In this post, we’ll walk through every step: graham cracker crust, the creamy filling, baking tips for crack-free results, gradual cooling, and smart chilling. We also cover troubleshooting, no-bake variations, equipment, ingredient swaps, and pretty serving ideas. Expect clear timing, yield info, and approachable instructions so you can bake with confidence. Let’s make something unforgettable together!
Key Takeaways
- We’ll guide you step-by-step to a creamy Philadelphia cheesecake using Philadelphia cream cheese.
- The recipe is friendly for all skill levels with clear timing and yield details.
- We include techniques to avoid cracks and achieve restaurant-quality texture.
- You’ll get troubleshooting tips, no-bake options, and ingredient substitutions.
- Decorating and make-ahead strategies help you serve this dessert with confidence.
If you love creamy cheesecake recipes, you might also enjoy our apple crumble cheesecake — it has a buttery crumble topping that’s perfect for fall and adds an irresistible crunch.
Why This Philadelphia Cheesecake Recipe Is a Crowd-Pleaser
We adore cheesecakes that feel like silky custard. This recipe achieves that by mixing rich ingredients with careful technique. It’s all about small steps and expert tips to make the cake dense, smooth, and creamy.

What makes a cheesecake irresistibly creamy
Creaminess comes from high-fat cream cheese and the right egg mix. Eggs add structure and their yolks make it silky. We mix just enough to avoid air, which can make it curdy and crack.
Baking and cooling slowly help the center set like custard. A gentle oven and a water bath prevent sudden temperature changes. This results in a dense, tender cake with a perfect balance of tang and sweetness.
Why Philadelphia cream cheese matters for texture and flavor
Philadelphia cream cheese has a consistent fat content and smooth texture. It’s chosen for its predictable melting and blending. This means fewer lumps and a velvety finish that stays smooth after chilling.
It’s widely available in U.S. supermarkets, making it a top choice for home bakers. Its formulation ensures reliable results, so you can add flavors like vanilla or lemon without worrying about texture issues.
Occasions where this easy dessert shines
- Birthdays — pairs well with berries or a chocolate drip.
- Holidays like Thanksgiving and Christmas — make ahead and chill for stress-free hosting.
- Dinner parties — elegant, yet simple to transport and slice.
- Bridal showers and potlucks — broad appeal and easy to portion.
- Weeknight special desserts — when we want something a bit luxe but not fussy.
Its ease of transport and make-ahead nature means we can impress a crowd with little effort. The flavor is loved by all ages, making it a go-to for any event.
Easy Philadelphia Cheesecake Recipe
We love how a classic Philadelphia cheesecake comes together with a few simple steps and pantry staples. This recipe makes one 9-inch springform cheesecake that serves 8–12 people depending on slice size. The core parts are a graham cracker crust, a silky Philadelphia cream cheese filling sweetened with sugar and eggs, and vanilla with optional lemon zest for brightness.
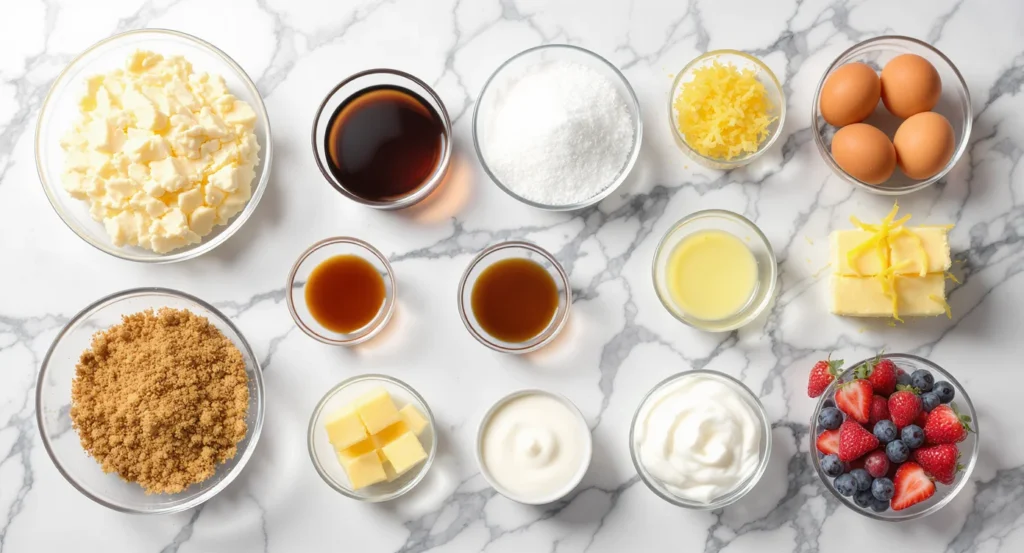
Overview of the recipe and yield
Yield: one 9-inch springform cheesecake, 8–12 servings. The crust is crushed graham crackers mixed with melted butter and a touch of sugar. The filling blends Philadelphia cream cheese, granulated sugar, whole eggs, vanilla extract, and a squeeze of lemon if you like a subtle tang. Bake in a water bath or at a controlled lower temperature for a smooth surface and even texture.
For a fun twist, you could try an Oreo cookie crust like in our no-bake mocha Oreo cheesecake — it’s rich, chocolatey, and pairs beautifully with a creamy filling.
Time breakdown: prep, bake, and chill
Active prep time runs about 20–30 minutes. This covers crushing the crackers, pressing the crust, and whisking the filling until smooth.
Bake time typically falls between 50–70 minutes. Exact time depends on your oven and pan. Look for set edges with a gentle wobble in the center.
Chill time is crucial. Let the cheesecake cool, then chill at least 4 hours. Overnight chilling, 8–12 hours, gives the best sliceable, creamy texture because it firms the crumb and lets flavors meld.
Skill level and why it’s approachable for home bakers
We rate this recipe easy-to-medium. The ingredient list is short and uses everyday items like Philadelphia cream cheese and eggs. Tools are basic: a 9-inch springform pan, mixing bowls, and a hand mixer or stand mixer.
- Tip 1: Bring cream cheese and eggs to room temperature for a lump-free batter.
- Tip 2: Mix gently to avoid air bubbles that cause cracks.
- Tip 3: A water bath helps prevent sudden temperature shifts and keeps the top smooth.
We guide you through each step with clear photos and notes so even first-timers can bake with confidence. Let’s make a creamy, crowd-pleasing cheesecake together!
Essential Ingredients for Classic Philadelphia Cheesecake
We want your cheesecake to shine. Start with high-quality staples and small tweaks that boost texture and flavor. Below we list what to buy and why each item matters, then offer a few tasty swaps to try.

Philadelphia cream cheese and alternatives
For a 9-inch cheesecake, use four 8-oz blocks of full-fat Philadelphia cream cheese. Full-fat gives the silkiest mouthfeel and best bake stability. Let the blocks sit at room temperature until soft before mixing.
- Philadelphia (full-fat) — four 8-oz blocks for a 9-inch cake.
- If you need a lighter option, use 2% cream cheese but expect a slightly less rich texture.
- Dairy-free alternatives like almond-based cream cheese work for special diets, though baking behavior differs.
Eggs, sugar, and flavorings: what to choose
Use large eggs at room temperature for a stable emulsion and consistent rise. Room-temp eggs blend more evenly and reduce lumps.
- Granulated sugar measured precisely controls sweetness and structure. Use a kitchen scale for accuracy.
- Pure vanilla extract, preferably Madagascar vanilla, adds warm, complex flavor.
- For brightness, add fresh lemon juice or zest. For a subtle twist, try 1 tsp almond extract.
- For extra creaminess stir in 1/2 to 3/4 cup sour cream or 1/2 cup heavy cream near the end of mixing.
- Add a pinch of fine salt to sharpen flavors.
Graham cracker crust ingredients and variations
Classic crusts are simple and forgiving. Use quality crumbs and room-temperature melted unsalted butter to bind them.
- Honey or plain graham cracker crumbs — about 1 1/2 cups for a 9-inch pan.
- Melted unsalted butter, roughly 6 to 8 tablespoons, to hold crumbs together.
- Optional 1 to 2 tablespoons brown sugar for deeper caramel notes and a pinch of salt to balance sweetness.
Try these variations for different textures and flavors:
- Oreo crust: finely crushed Oreos mixed with melted butter for a chocolatey base.
- Nut crust: ground pecans or almonds with a touch of maple syrup for a toasty, slightly sticky shell.
- Gluten-free: certified gluten-free graham crumbs or crushed gluten-free cookies paired with butter.
If you’re a fan of nutty desserts, our honey pistachio baklava makes a wonderful companion to cheesecake — the flaky pastry and syrupy pistachios are a match made in dessert heaven.
Kitchen Tools and Equipment You’ll Need for this Easy Philadelphia Cheesecake Recipe
We keep things simple to make baking a Philadelphia cheesecake easy and fun. The right tools save time and help you achieve that smooth, creamy finish. Here are our must-haves and some extras that make baking easier in your home kitchen.
Recommended bakeware: springform pan sizes
- 9-inch springform pan — the classic choice for even baking and reliable results.
- 8-inch springform pan — use this when you want a taller cheesecake with a deeper filling.
- 10-inch springform pan — choose this for a thinner, party-size cheesecake that slices easily.
- Aluminum foil — wrap the pan base and sides to seal for a water bath and prevent leaks.
- Rimmed baking sheet — place the wrapped pan on this to catch drips and make the water bath easier.
Mixing tools and thermometer suggestions
- Stand mixer with paddle attachment — best for smooth, lump-free batter when you need hands-free mixing.
- Hand mixer — a great alternative for smaller batches or limited counter space.
- Rubber spatula — essential for scraping the bowl and folding without deflating the batter.
- Whisk — handy for dry ingredients and light folding of flavorings.
- Fine mesh sieve — use this to sift powdered sugar or cornstarch for a silky texture.
- Instant-read thermometer — check internal temperature around 150–160°F if you want precise doneness and fewer guesswork slices.
Optional gadgets that make the process easier
- Food processor — crush graham crackers quickly for a uniform crust.
- Zip-top bag and rolling pin — a budget-friendly crust crusher when you don’t have a processor.
- Silicone crust press or a measuring cup — press crumbs evenly to avoid gaps and weak spots.
- Offset spatula or cake lifter — make clean slices and neat transfers to plates.
- Springform pan liner or parchment circles — line the base for easy release and less sticking.
It’s a good idea to lay out these items before you start. This small step makes the bake smooth and lets you focus on flavor and texture. Happy baking!
Step-by-Step Preparation of the Graham Cracker Crust
We all want a crust that’s sturdy and full of flavor. A good crust starts with crushed graham crackers and a simple mix to hold it together. Follow these steps to make a crisp, even base for your Philadelphia cheesecake!
How to achieve the perfect crumb texture
Pulse graham crackers in a food processor until they’re fine and even. If you don’t have a processor, put crackers in a sealed bag and crush them with a rolling pin. You’ll need about 1½ to 2 cups of crumbs for a 9-inch pan.
Fine crumbs stick together well, making a solid crust. If the crumbs are too big, your crust might fall apart when you cut it.
Pressing crust into the pan without cracks
Mix the crumbs with 5 to 6 tablespoons of melted unsalted butter and 2 tablespoons of sugar or light brown sugar. Make sure all crumbs are well coated.
Put the crumbs into a 9-inch springform pan. Use the bottom of a measuring cup to press them down firmly and evenly. This makes sure the crust is even and prevents cracks.
Pre-baking vs. no-bake crust methods
For a crust that’s firmer and crisper, pre-bake it at 350°F for 8–10 minutes. This step helps prevent a soggy bottom when you add the filling, especially for baked cheesecakes.
No-bake cheesecakes are quicker to make. Chill the crust until it’s set. Add a tablespoon of honey or a bit more butter to help it stick together if you’re going the no-bake route. No-bake crusts are softer and more tender than pre-baked ones.
- Tip: Use unsalted butter so you control salt level.
- Tip: Measure crumbs by volume for consistent results.
- Tip: Cool a pre-baked crust completely before adding filling to avoid steam softening.
Mixing the Creamy Philadelphia Cheesecake Filling
We aim for a silky, even filling. Start with a calm routine. This ensures the batter blends well and stays dense for a velvety texture.
- Bring Philadelphia cream cheese, eggs, and sour cream to room temperature for at least 30 minutes.
- Cut the cream cheese into 1-inch cubes before mixing so it softens faster and blends without lumps.
- Measure ingredients while they warm so nothing sits out too long.
Beating technique to avoid overmixing and air bubbles
- Use a paddle attachment or a hand mixer on low-to-medium speed.
- Beat the cream cheese until smooth, then add sugar in two or three additions.
- Add eggs one at a time, mixing only until each is incorporated to limit trapped air.
- Stop periodically to scrape the bowl with a spatula so no pockets of unmixed cheese remain.
- Before transferring to the pan, tap the filled pan on the counter a few times to release large air bubbles.
How to incorporate flavorings like vanilla and lemon
- Fold in pure vanilla extract and lemon zest or a splash of fresh lemon juice at low speed for even flavor.
- If your recipe uses sour cream or heavy cream, add it last and stir gently to keep the texture smooth.
- For an ultra-silky finish, press the batter through a fine-mesh sieve into the springform pan.
These steps help keep the filling dense, creamy, and lump-free. Small mixing habits make a big difference. They make baking less intimidating and more enjoyable!
Baking Techniques for a Smooth, Crack-Free Cheesecake
We want your Philadelphia cheesecake to be glossy, creamy, and crack-free. Careful baking is key. Small steps during baking and cooling help keep the texture silky.
Water bath method and why it helps
Wrap the outside bottom of a 9-inch springform pan with heavy-duty foil. Place it in a larger roasting pan. Fill the roasting pan with hot water until it’s halfway up the springform sides.
The hot water provides even, moist heat. This prevents sharp temperature swings. As a result, you get fewer cracks and a smoother surface.
Oven temperature and timing best practices
Preheat to 325°F for a steady bake. Some recipes suggest up to 350°F, but avoid high temps. A 9-inch cheesecake usually bakes for 50 to 70 minutes.
- Start at 325°F for most batters.
- Use the lower end of the time range for smaller pans.
- Keep the water bath in place for the whole bake.
How to test for doneness without overbaking
Check for set edges and a center that jiggles a bit. The center should not be liquid. Use an instant-read thermometer; aim for 150–155°F in the center.
Turn off the oven and crack the door for 15–20 minutes. This slow cooling helps the custard set without shrinking or cracking.
Cooling and Chilling: Key Steps for Creamy Texture
After the cheesecake comes out of the oven, magic happens. Slow cooling and the right chill time make it silky and sliceable. Just follow a few simple steps to keep it smooth and flavorful.
Gradual cooling to prevent cracking
Turn off the oven and crack the door right after baking. Let the cheesecake sit for 30–60 minutes. This helps it cool evenly and prevents cracks.
For extra safety, run a thin knife around the pan edge when it’s warm but not hot. This helps the cake release from the pan and prevents it from splitting.
Chilling times for slicing and serving consistency
- Refrigerate for at least 4 hours for basic firmness.
- Chill 8–12 hours, ideally overnight, for the creamiest texture and best flavor melding.
Longer chilling makes the custard firmer and flavors meld better. Slice with a hot, clean knife for neat portions.
Storage tips for best texture after chilling
Wrap the cake tightly in plastic wrap or use an airtight container. Store in the fridge for 4–5 days. For longer storage, freeze whole or in slices up to 2 months.
Thaw frozen cheesecake overnight in the fridge. Avoid leaving slices at room temperature for long periods; warm exposure softens the custard and changes the serving texture.
Decorating and Serving Ideas for Philadelphia Cheesecake
We love adding simple touches to our Philadelphia cheesecake. A splash of bright fruit, a glossy sauce, or a neat garnish can make it a showstopper. Here are some easy ideas for weeknight desserts, dinner parties, and potlucks.
Classic toppings: fruit compote, fresh berries, and sauces
Make a mixed berry compote by simmering strawberries, blueberries, and raspberries with sugar and lemon juice. Cook until the berries release their juices and the mixture thickens. Spoon it over a chilled cake just before serving to avoid a soggy top.
- Use sliced fresh strawberries for a clean, bright look.
- Scatter whole blueberries for texture and color contrast. For more creative fruit topping ideas, check out BBC Good Food’s cheesecake topping inspirations — they have gorgeous combinations from tropical fruits to tangy citrus blends.
- Try a thin berry coulis for a refined, restaurant-style finish.
Decadent add-ons: chocolate ganache and whipped cream
For chocolate lovers, warm chopped dark chocolate and heavy cream to make a silky ganache. Pour it in a thin ribbon over the center and let it settle. Pipe lightly sweetened whipped cream around the edges for balance.
- Toasted almonds or pecans add crunch when sprinkled on top.
- Drizzle salted caramel for a sweet-salty contrast with Philadelphia cream cheese.
- Pair lemon-flavored cheesecake with blueberry compote for a bright combo.
Plating tips for gatherings and special occasions
For picture-perfect slices, warm your knife under hot water, dry it before each cut, and serve on chilled plates to keep the texture firm and the presentation fresh. Offer garnishes like mint leaves, edible flowers, or thin lemon slices for a polished look.
- Portioning tip: cut smaller squares for buffets and larger slices for plated desserts.
- Label options at parties so guests can pick fruit, chocolate, or caramel variations.
- Arrange a small dessert station with spoons of compote, bowls of whipped cream, and a jug of ganache for DIY finishing fun!
Variations: No-Bake and Other Flavor Twists
We love to add simple, creative twists to our Philadelphia cheesecake base. Below are easy swaps and flavor ideas that keep the texture rich and the process friendly for home bakers. Pick one and have fun experimenting!
No-bake cheesecake version
- Use softened Philadelphia cream cheese for a silky base.
- Beat in powdered sugar until smooth, then fold in whipped heavy cream or a whipped topping for lift.
- For stability, bloom gelatin in cold water, warm slightly until dissolved, then mix into a few tablespoons of the cheesecake base before folding into the rest.
- Press the filling into your prepared crust and chill at least 4 hours until set. This method yields a creamy, sliceable cake without turning on the oven.
Flavor variations to try
- Chocolate: fold melted Guittard or Ghirardelli semi-sweet chocolate into the cooled filling for a deep chocolate cheesecake.
- Lemon: stir in fresh lemon juice and zest for a bright, tangy lift.
- Caramel: swirl warm caramel or dulce de leche through the filling for marbled sweetness.
- Seasonal: pumpkin spice mixed into the filling makes a great fall cake; strawberry-rhubarb purée swirled in gives a fresh spring flavor.
Crust alternatives and ratios
- Oreo crust: pulse Oreo cookies (filling removed) to fine crumbs, then mix with melted butter at a 1:0.35 ratio (1 cup crumbs : 0.35 cup butter). Press and chill or prebake briefly.
- Nut crusts: pulse almonds or pecans, combine with 1–2 tablespoons honey per cup of nuts and 2–3 tablespoons melted butter to bind. Press firmly for a crunchy base.
- Gluten-free options: swap in gluten-free graham crumbs or gluten-free cookie crumbs at a 1:0.25 ratio with butter. Add an extra tablespoon of butter or a teaspoon of honey if crumbs seem dry.
We recommend testing one change at a time so you can judge texture and flavor. Small tweaks let us keep that classic Philadelphia cream cheese creaminess while exploring bold new tastes. Happy baking!
Common Cheesecake Problems and Easy Fixes
We all face challenges when baking cheesecake. A few simple checks and quick fixes can help. Here are some practical tips for the next time you need to rescue your cheesecake!
How to fix cracks and texture issues
- Small surface cracks: cover them with a glossy ganache, a swirl of whipped cream, or a bright fruit compote for a clean finish.
- Deeper fissures: trim the damaged area with a warm knife, then pipe a frosting border made from cream cheese frosting to seal and decorate.
- Root causes: overbeating the batter traps air, oven set too hot causes rapid rise and fall, and quick cooling makes the top split. Beat gently, bake at a steady low temperature, and cool gradually in the oven with the door ajar.
What to do if your cheesecake is too wobbly
- Underbaked filling often feels jiggly. Return the cake to the oven and bake in 10-minute increments until the center is set but still slightly wobbly.
- Chill time matters. Let the cake cool to room temperature, then refrigerate at least overnight so proteins and fats firm up for clean slices.
- No-bake versions: confirm the recipe uses enough gelatin or stabilized whipped cream. If set is weak, dissolve extra gelatin and brush into the surface, then chill to firm.
Preventing soggy crusts and uneven baking
- Pre-bake your graham crust 8–10 minutes to lock in structure. This cuts moisture transfer from the filling.
- Seal crusts by brushing with melted bittersweet or semisweet chocolate and letting it harden before adding the filling.
- Use a water bath to promote even heat. Wrap the springform pan in foil to keep water out. Rotate the pan only if your oven has hot spots, and check temperature with an oven thermometer for consistent results.
Ingredient Substitutions and Dietary Adaptations For Easy Philadelphia Cheesecake Recipe
We love making this Philadelphia cheesecake work for every kitchen and every diet. Below we share smart swaps that keep texture and flavor while meeting low-sugar, gluten-free, dairy-free, and high-altitude needs. Pick what fits your pantry and taste buds!
Low-sugar, low-fat, and reduced-calorie swaps
- For less sugar, try natural sweeteners like erythritol or a stevia blend. The Harvard T.H. Chan School of Public Health provides an excellent review of alternative sweeteners, helping you choose the best option for health and taste in your baking. Cut granulated sugar by about 20% to start and taste as you go.
- Use Neufchâtel or reduced-fat Philadelphia cream cheese in place of full-fat for lower calories. Expect a slightly softer set and adjust chill time.
- Swap full-fat sour cream with low-fat sour cream. Texture will change; extend baking by a few minutes if the center seems too loose.
Gluten-free and dairy-free substitution options
- For a gluten-free crust, use certified gluten-free graham crackers or press an almond flour crust for a nutty flavor. Almond crusts pair nicely with erythritol for keto-friendly versions.
- Dairy-free bakers can use brands like Kite Hill or Tofutti dairy-free cream cheese and substitute coconut cream for heavy cream. Note that dairy-free cheeses often need a no-bake approach for best results.
- Expect variations in structure and bake time when using dairy-free products. A chilled, no-bake cheesecake is more forgiving and yields creamier results with plant-based creams.
Adapting the recipe for higher altitudes or special diets
- At high altitude, cut sugar slightly and reduce liquids. If your recipe calls for rising agents, lower them and raise oven temperature by 15–25°F.
- Keto adjustments work well: almond flour crust, erythritol for sweetening, and full-fat Philadelphia cream cheese help preserve creaminess and set.
- For other special diets, test small batches. Keep notes on texture, bake time, and chill time so you can repeat successes at the next gathering.
We recommend making one small trial cheesecake when trying major swaps. That keeps the party stress-free and helps you fine-tune the texture and flavor before serving guests!
Baking Tips Specific to Philadelphia Cream Cheese Cheesecakes
We love working with Philadelphia cream cheese. It behaves well in the oven and makes silky results. Here are some tips from our test kitchen for a smooth, creamy filling every time. Small tricks can make a big difference!
How to store and soften Philadelphia cream cheese correctly
Keep Philadelphia cream cheese refrigerated until you use it. An unopened block lasts longer in a cool place.
To soften, leave an unopened block at room temperature for 30–60 minutes. If you need it fast, cut it into 1-inch cubes. Microwave in 5–7 second bursts until soft.
Avoid overheating. Too much heat can make the curds separate and your batter grainy.
Why Philadelphia cream cheese yields superior creaminess
Philadelphia cream cheese has a consistent fat-to-water ratio. This balance makes it dense and smooth, spreading evenly in the filling.
Use full-fat block-style Philadelphia for baking. It blends well into batter. Whipped or tub varieties have air and moisture that change the texture and baking.
Full-fat blocks help the filling set firm but stay velvety. This gives cleaner slices and richer flavor.
Shopping tips to select the best cream cheese for baking
- Check expiration dates on the package to ensure freshness.
- Buy full-fat block-style Philadelphia for best structure and taste.
- Skip whipped, tub, and “spreadable” versions when baking cheesecakes.
- For budget shoppers, look for seasonal sales or store brands with similar fat content; compare the label before you buy.
Follow these tips for better texture, flavor, and appearance in your cheesecake. We use them every time we bake with Philadelphia cream cheese!
Serving, Storage, and Make-Ahead Strategies
We want your Philadelphia cheesecake to taste as fresh as the day it came out of the oven. A few simple habits keep texture and flavor at their best. Whether you’re serving tonight or planning for a holiday gathering, we’ve got you covered. Below, we cover fridge and freezer shelf life, make-ahead steps, and safe thawing and gentle reheating tips.
How long homemade cheesecake keeps in the fridge and freezer
- Refrigerator: Store the cooled cheesecake in an airtight container or tightly wrapped in plastic wrap. It will stay good for 4–5 days.
- Freezer: For longer storage, wrap the whole cake or individual slices in plastic, then in foil, or place in freezer-safe containers. Frozen cheesecake keeps up to 2 months.
- Label with date before freezing so you use the oldest first.
Make-ahead steps for parties and holidays
- Bake a day ahead and chill overnight. The extra chill time firms the texture and eases slicing.
- Keep fresh toppings, like berry compote or whipped cream, separate until just before serving to avoid soggy crusts.
- For travel, pack the cheesecake in a cooler with ice packs. Place toppings in sealed containers and carry utensils separately.
Reheating and thawing best practices
- Thaw frozen cheesecake in the refrigerator overnight for even thawing and stable texture.
For additional freezer storage tips to maintain dessert quality, the USDA’s Food Safety and Inspection Service offers essential advice on freezing and thawing foods safely without compromising flavor or texture.
- Bring slices to room temperature for 20–30 minutes before serving to restore flavor and creaminess.
- Avoid microwaving a whole cake. If you warm a single slice, heat for just a few seconds to avoid melting the filling.
Conclusion
We’ve covered every step to make a creamy Philadelphia cheesecake. Start with Philadelphia cream cheese and make sure ingredients are at room temperature. Mix gently and bake in a water bath. Cool slowly for the best results.
Don’t be afraid to try new things like a no-bake version or adding chocolate or lemon. You can also swap out the crust for something like Oreo or nuts. If problems arise, like cracks or a soggy crust, there are solutions. Always chill your cheesecake well before serving.
Let’s cook together! Share your cheesecake photos, ask questions, and share your own twists. With these tips, you can make a classic cheesecake that’s creamy and delicious. It’s perfect for any occasion.

Easy Philadelphia Cheesecake Recipe
Short Description
This irresistible Philadelphia cheesecake is luxuriously creamy, rich in flavor, and surprisingly easy to make at home.
Perfect for beginners and seasoned bakers alike, it features a buttery graham cracker crust, a silky Philadelphia cream cheese filling,
and endless topping options from fresh berries to chocolate ganache.
With a few pro tips, you’ll get a decadent, crack-free cheesecake every time.
Recipe Details
- Serving Size: 8–12 slices
- Prep Time: 25 minutes
- Cook Time: 60 minutes
- Total Time: 7 hours (includes chilling)
Ingredients per Serving
- 1/2 block (4 oz) full-fat Philadelphia cream cheese, softened
- 2 tbsp granulated sugar
- 1/4 large egg (about 1 tbsp beaten egg)
- 1/8 tsp pure vanilla extract
- 1/2 cup graham cracker crumbs
- 1 tbsp unsalted butter, melted
- Optional: 1/4 tsp lemon zest or juice
- Optional toppings: fresh berries, chocolate ganache, whipped cream
Nutritional Facts
- Calories: ~320
- Protein: 5g
- Carbohydrates: 27g
- Fat: 21g
- Fiber: 0.5g
- Sodium: 210mg
- Sugar: 18g
Instructions
Step 1 – Prepare the Crust
Preheat your oven to 350°F (175°C). Mix graham cracker crumbs, melted butter, and a touch of sugar until evenly combined.
Press firmly into the base of a 9-inch springform pan using the bottom of a measuring cup to create an even layer.
Bake for 8–10 minutes, then set aside to cool completely.
Step 2 – Make the Creamy Filling
Reduce oven heat to 325°F (163°C). In a large mixing bowl, beat softened Philadelphia cream cheese on low speed until smooth.
Add sugar in two parts, blending gently after each addition. Mix in eggs one at a time, followed by vanilla and optional lemon zest.
Avoid overmixing to prevent air bubbles.
Step 3 – Assemble and Bake
Pour the filling over the cooled crust. Tap the pan gently on the counter to release air bubbles.
Wrap the pan in foil and place it in a larger roasting pan filled halfway with hot water for a water bath.
Bake 50–70 minutes, until edges are set and the center has a slight wobble.
Step 4 – Cool Gradually
Turn off the oven and crack the door, allowing the cheesecake to cool inside for 30–60 minutes.
Remove from the oven, run a thin knife around the edges, and let it reach room temperature before refrigerating.
Step 5 – Chill for Best Texture
Refrigerate the cheesecake for at least 4 hours, ideally overnight, to let the flavors develop and the texture firm up for clean slicing.
Step 6 – Garnish and Serve
Top with fresh berries, a drizzle of chocolate ganache, or whipped cream right before serving.
Slice with a knife warmed in hot water for picture-perfect pieces. Enjoy your silky, luscious Philadelphia cheesecake!