Growing up in the Midwest, summer was all about exploring amazing desserts. Our gooey butter cake ice cream recipe brings back those sweet memories. It turns a classic St. Louis treat into a frozen delight!
If you love nostalgic desserts with a twist, you’ll also want to check out our chocolate and vanilla ice cream sundae for another creamy, crowd-pleasing favorite.
This homemade gooey butter cake ice cream recipe is more than a dessert. It’s a journey that mixes tradition with creativity. We’ll show you how to make a creamy, indulgent treat that celebrates a beloved regional flavor.
Whether you’re an experienced cook or just starting out, our recipe will inspire you. You’ll create something magical in your kitchen. Impress your friends and family with a unique dessert that’s full of flavor!
Key Takeaways
- Discover the authentic origins of gooey butter cake ice cream
- Learn professional techniques for creating creamy, smooth ice cream
- Master a foolproof homemade gooey butter cake ice cream recipe
- Understand the cultural significance behind this unique dessert
- Explore creative serving and adaptation options
Understanding the St. Louis Origins of Gooey Butter Cake
St. Louis, Missouri, is famous for the gooey butter cake. This dessert has a story that food lovers find fascinating. It shows how a simple mistake can lead to something amazing.
If you’re curious about other Midwest-inspired bakes, our ooey gooey carrot butter cake recipe is another must-try that brings comfort and nostalgia to your table.
The Accidental Creation Story
It’s said that gooey butter cake was created by accident. In the 1930s, a baker mixed up the ingredients for a traditional cake. But instead of throwing it away, he found something incredible.
- A rich, dense cake with an incredibly soft texture
- A sweet, gooey center that melted in your mouth
- A unique dessert that would become a St. Louis culinary treasure
Evolution from Cake to Ice Cream
The gooey butter cake recipe was later turned into ice cream. Bakers and ice cream makers experimented with it. They created a frozen version that honors the original.
Cultural Significance in American Desserts
The gooey butter cake has become a favorite across America. It’s more than just a dessert. It shows how creativity and tradition can come together in amazing ways.
Sometimes the best recipes are born from happy accidents!
Essential Ingredients for Perfect Gooey Butter Cake Ice Cream Recipe
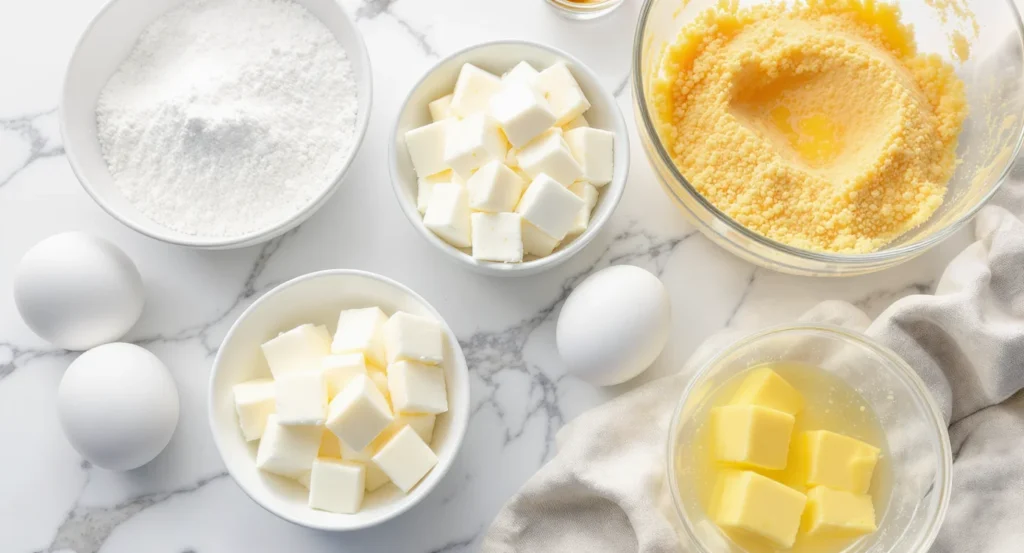
Making the perfect gooey butter cake ice cream starts with top-notch ingredients. This recipe blends the creamy indulgence of classic cream cheese ice cream with the irresistible richness of gooey butter cake.
For even more creative ice cream inspiration, try our easy brown butter ice cream recipe—it’s a decadent treat that’s just as simple to make at home.
Now, let’s explore the key ingredients that make this ice cream special:
- Cream Cheese: The star of our cream cheese ice cream base, providing a tangy and luxurious foundation
- Heavy cream for ultimate richness
- Buttermilk ice cream components for a subtle tanginess
- Pure vanilla extract
- Granulated sugar
- Large egg yolks
For the gooey butter cake ice cream ingredients, we’ll need some extra special touches:
- Softened cream cheese
- Butter (unsalted, preferably high-quality)
- Powdered sugar
- Vanilla cake mix
The secret to amazing buttermilk ice cream is using the best ingredients. Choose full-fat dairy and fresh eggs for the best flavor and texture. Each part is key to a dessert that’s both nostalgic and indulgent!
Pro tip: Room temperature ingredients blend more smoothly and create a more consistent ice cream base!
Kitchen Equipment and Tools You'll Need
To make the perfect easy gooey butter cake ice cream, you need more than just great ingredients. The right kitchen tools make your homemade ice cream journey smooth and fun! Let’s look at the essential equipment that turns your kitchen into an ice cream paradise.

Getting ready for your homemade ice cream journey means getting the right tools. We’ll cover the must-have equipment to make sure your gooey butter cake ice cream is creamy and delicious.
Ice Cream Maker Choices
Not all ice cream makers are the same! Here are some options for making your tasty treat:
- Traditional Churning Machines: Perfect for serious home ice cream makers
- Compact Countertop Models: Ideal for small kitchens
- No-Churn Options: Great for beginners without specialized equipment
Essential Mixing and Storage Tools
Your homemade ice cream success depends on the right mixing and storage equipment:
- Heavy-duty mixing bowls
- Sturdy whisk
- Rubber spatula
- Airtight freezer-safe containers
Temperature Control Essentials
Precision is key when making the perfect easy gooey butter cake ice cream recipe. Invest in these temperature control tools:
- Digital instant-read thermometer
- Reliable kitchen scale
- Freezer thermometer
Pro tip: The right equipment can make your homemade ice cream go from good to amazing! Don’t be afraid to invest in quality tools for delicious frozen treats every time.
Preparing the Gooey Butter Cake Base
Making the perfect gooey butter cake is an art. It turns a simple dessert into a masterpiece! Our recipe starts with the right ingredients and the right mix of flavors.
Let’s look at what we need for our base:
- Cream cheese (softened)
- Unsalted butter
- Powdered sugar
- Vanilla extract
- Large eggs
The secret to a great gooey butter cake is in how you prepare it. We’ll show you how to make a base that’s creamy yet slightly crisp. It’s perfect for our ice cream adventure!
“Baking is love made edible” – Anonymous Pastry Chef
First, preheat your oven to 350°F. Mix the butter and cream cheese until smooth. Then, add powdered sugar slowly. The mix should be silky and light, with no lumps.
Pro tip: Use room temperature ingredients for the best gooey texture. Mix gently and avoid overmixing. This keeps the base tender and not tough.
- Gentle folding makes the base light and airy
- Use a hand mixer for the best results
- Remember, patience is key!
Crafting the Perfect Cream Cheese Ice Cream Base
Making cream cheese ice cream is like creating a work of art. It turns simple ingredients into a luxurious treat. Our recipe for gooey butter cake ice cream starts with a rich cream cheese base. It’s sure to make your taste buds happy.
The secret to great cream cheese ice cream is knowing how to mix ingredients just right. We’ll show you how to make a custard ice cream base that’s smooth and creamy. It’s something you’ll love.
Temperature Precision Matters
Getting the right temperature is key for smooth ice cream. Here’s what you need to know:
- Keep ingredients at room temperature before mixing
- Use an instant-read thermometer for accuracy
- Heat custard base to 170°F to ensure food safety
- Cool mixture quickly to prevent curdling
Mixing for Maximum Smoothness
Our secret to creamy ice cream is gentle mixing. Follow these steps:
- Whisk cream cheese until completely smooth
- Strain the mixture to remove any lumps
- Use a hand mixer or stand mixer for best results
- Fold ingredients gently to maintain air incorporation
Consistency is Key
The perfect ice cream base is firm but creamy. Look for these signs during preparation:
- Mixture should coat the back of a spoon
- Texture should be thick but pourable
- No visible cream cheese lumps
- Smooth, glossy appearance
Follow these tips, and you’ll make a cream cheese ice cream base that’s amazing. It’s perfect for your homemade gooey butter cake ice cream!
The Role of Buttermilk in Enhanced Flavor
Buttermilk is the secret that makes gooey butter cake ice cream special. It adds a tangy flavor that takes our ice cream from good to amazing.
Buttermilk brings magic to our ice cream. Its tanginess contrasts with the sweet gooey butter cake. This makes the ice cream smooth and creamy.
- Adds a bright, tangy flavor profile
- Improves overall texture of the ice cream
- Provides natural tenderness to the base
- Balances the sweetness of the gooey butter cake pieces
The science behind buttermilk is cool. It has less fat and special bacteria that make ice cream lighter and fresher. Professional pastry chefs know buttermilk makes smooth frozen desserts.
Pro tip: Always use fresh, high-quality buttermilk for the best results in your homemade ice cream!
Adding buttermilk to our gooey butter cake ice cream recipe is more than just making a dessert. It’s creating a special experience that will wow anyone who tries it!
Step-by-Step Churning Process
Churning turns your gooey butter cake ice cream into a creamy treat. It’s a magical moment that needs precision and finesse.
- Chill your ice cream maker’s bowl for at least 24 hours before churning
- Ensure your ice cream base is thoroughly cold (around 40°F)
- Pour the chilled mixture into the pre-frozen ice cream maker
Timing Your Churn to Perfection
The churning process usually takes 20-25 minutes. Look for these signs to know your ice cream is done:
- Mixture thickens and resembles soft-serve consistency
- Mixture pulls away from the sides of the churning container
- Texture becomes smooth and creamy with minimal liquid
“Patience is key in ice cream making – rush the process, and you’ll miss out on that perfect, velvety texture!” – Professional Ice Cream Maker
Temperature Control Techniques
Keeping the right temperature is key for smooth, creamy ice cream. Use an instant-read thermometer to check the mixture’s temperature.
Pro tip: Stop churning when the ice cream is soft-serve. This makes it scoopable after freezing!
Incorporating Gooey Butter Cake Pieces
Making the perfect gooey butter cake ice cream is all about adding cake pieces right. Our way makes sure every bite is full of flavor and texture.
Timing is key when making this ice cream. Prepare the cake pieces before you start churning. Cut them into small cubes, about 1/2 inch each. This makes sure they’re spread out evenly in the ice cream.
- Chill cake pieces before adding to prevent melting
- Use room temperature cake for easier cutting
- Aim for consistent cube sizes
To get the gooey butter cake ice cream just right, add the cake pieces during the last few minutes of churning. This keeps them from sinking and keeps their texture.
To get the gooey butter cake ice cream just right, add the cake pieces during the last few minutes of churning. This keeps them from sinking and keeps their texture. For more tips on safe and effective food freezing, check out this helpful guide from the USDA: USDA Freezing and Food Safety.
Freezing the cake pieces for 15-20 minutes before adding them is a great tip. It helps them keep their shape and not break apart in the ice cream. For more insights into the science of freezing and its effect on food texture, explore this resource from Food Science of the World Health Organization (WHO).
The secret to amazing gooey butter cake ice cream is finding the right balance between cake pieces and smooth ice cream!
Try different amounts of cake pieces to find your favorite mix. Some like a big chunk in every bite, while others prefer a hint of cake.
Proper Storage and Freezing Techniques
Keeping your homemade gooey butter cake ice cream fresh is key! The right storage keeps it tasty for days. It’s all about preserving that creamy texture and flavor.
It’s important to avoid freezer burn. The right storage method keeps your ice cream fresh and delicious. This way, you can enjoy it just as you made it.
Choosing the Perfect Storage Container
For storing your treat, look for containers that fit these criteria:
- Airtight seal to keep out moisture and odors
- Shallow, wide containers for even freezing
- Freezer-safe materials like glass or hard plastic
- Containers with little air space to prevent ice crystals
Optimal Freezing Temperature Techniques
Temperature control is crucial for your ice cream. Keep the freezer at 0°F to -10°F (-18°C to -23°C). This ensures your ice cream stays perfect.
Pro tip: Place your ice cream in the coldest part of the freezer, typically the back, away from the door to minimize temperature fluctuations!
By following these tips, your gooey butter cake ice cream will stay a delightful treat. It will taste amazing even days after you make it.
Troubleshooting Common Ice Cream Issues
Making the perfect gooey butter cake ice cream can be tricky. Even skilled cooks face problems when making ice cream at home. But don’t worry, we’re here to guide you through common issues!
Let’s look at some common ice cream problems and how to fix them:
- Icy Texture: Too much water can cause this. To avoid ice crystals, make sure your base has enough fat and sugar. They help keep it smooth.
- Grainy Consistency: This is often due to sugar crystallization. Mix your ingredients well and use corn syrup to prevent it.
- Separation or Curdling: Always add eggs slowly and keep the temperature steady when making your base.
Professional ice cream makers stress the importance of temperature control. When churning, keep your freezer at 0°F (-18°C). This ensures a smooth, creamy texture.
Pro tip: Patience is key in ice cream making. Rushing can result in poor quality!
Remember, the more you make, the better you’ll get. Each batch is a chance to improve and get closer to the perfect gooey butter cake ice cream.
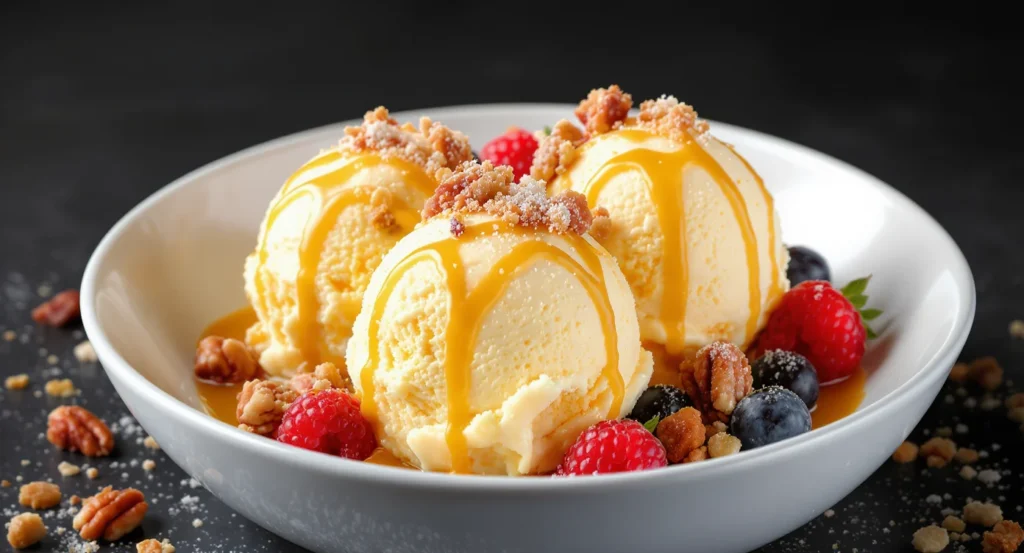
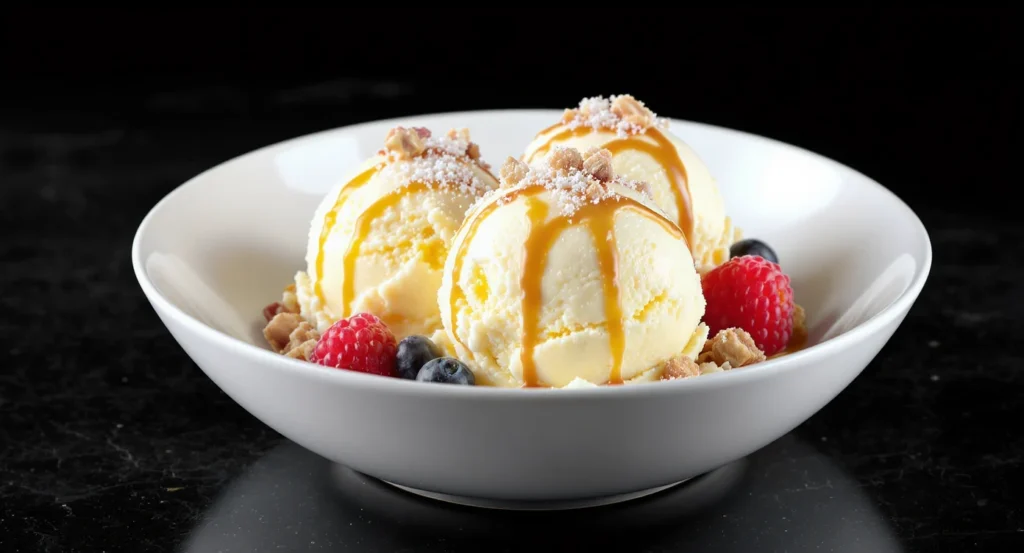
Creative Serving Suggestions and Pairings
Take your gooey butter cake dessert to new levels with these creative ideas. Our decadent ice cream recipes aim to create unforgettable moments. They delight both your eyes and taste buds.
Irresistible Toppings to Enhance Flavor
- Sprinkle caramelized pecans for crunch
- Drizzle warm brown butter sauce
- Add crushed graham cracker pieces
- Dust with powdered sugar
- Garnish with fresh berries
Unique Dessert Combinations
Pair your gooey butter cake ice cream with treats that will wow your guests:
- Classic warm chocolate brownie
- Salted caramel apple pie
- Cinnamon churro bites
- Vanilla pound cake slices
Each pairing highlights different flavors in our ice cream. It creates a flavor symphony that will leave your dessert unforgettable!
Pro tip: Always serve your ice cream slightly softened for the most luxurious texture and maximum flavor enjoyment!
Tips for Achieving Professional-Quality Results
Making the best gooey butter cake ice cream is more than just following a recipe. It’s about mastering the art of dessert making. We’ll share our top tips to make your gooey butter cake ice cream as good as a restaurant’s.
Temperature control is key when making premium ice cream. Precision matters! Make sure your ingredients and equipment are cold before you start. A cold base gives a smoother texture and prevents ice crystals.
- Use fresh, high-quality ingredients for the most authentic flavor
- Invest in an accurate kitchen thermometer
- Chill your ice cream base thoroughly before churning
- Strain your mixture to remove any potential lumps
Texture is what makes gooey butter cake ice cream great. Whip your cream cheese until it’s silky smooth. The goal is to mix gently and evenly, adding air without overworking.
Pro tip: Let your ice cream soften for 5-10 minutes before serving to achieve that perfect, creamy consistency!
When adding cake pieces, fold them gently to keep their texture. Freeze the cake chunks first to prevent them from dissolving during mixing.
- Cut cake pieces into uniform, small cubes
- Freeze cake pieces for 30 minutes before adding
- Fold cake pieces in just before final churning
Practice and patience are key to becoming an ice cream master. Each batch you make will improve your skills, bringing you closer to that perfect dessert everyone will love!
Variations and Flavor Adaptations
Ready to make your gooey butter cake ice cream recipe even better? Our unique homemade ice cream ideas will help you create amazing variations. They will surely impress your taste buds!
Trying out different flavors is key to making creative desserts. Our gooey butter cake ice cream recipe is the perfect base for your creativity.
- Seasonal Fruit Swirls: Add fresh strawberries, peaches, or raspberries for a summer twist
- Chocolate Lovers’ Dream: Mix in dark chocolate chunks or a chocolate ribbon for a chocolatey treat
- Nutty Crunch Variation: Add toasted pecans, almonds, or praline pieces for extra texture
- Spiced Warmth: Add cinnamon, nutmeg, or cardamom for a cozy flavor
Each variation adds a special touch to the classic gooey butter cake ice cream. You can make it your own or match it with the season.
Pro tip: Always taste and adjust your mix-ins to ensure they complement the rich, creamy base of the ice cream!
By trying these creative adaptations, you’ll take your homemade ice cream to the next level!
Make-Ahead and Storage Guidelines
Planning ahead is key to enjoying your delicious homemade gooey butter cake ice cream! We’ll guide you through the best storage techniques. This way, your frozen treat will stay fresh and tasty for weeks.
Proper storage is crucial for maintaining the incredible texture and flavor of your homemade gooey butter cake ice cream. The right container and freezing method can make all the difference. This ensures your delightful dessert stays perfect.
Long-Term Storage Solutions
- Use airtight, freezer-safe containers with tight-fitting lids
- Choose containers made of glass or high-quality plastic
- Leave a small space at the top to allow for expansion
- Wrap the container in plastic wrap for extra protection
Maintaining Optimal Texture
Keeping your gooey butter cake ice cream homemade means paying attention to freezing and storage details. Here are some pro tips to preserve that perfect creamy consistency:
- Store at a consistent temperature of 0°F (-18°C)
- Place the container in the coldest part of the freezer
- Avoid frequent temperature fluctuations
- Consume within 2-3 weeks for best quality
Pro tip: Before serving, let your homemade gooey butter cake ice cream sit at room temperature for 5-10 minutes. This helps restore its creamy texture and makes scooping a breeze!
Remember, great ice cream is all about careful preparation and storage. Your homemade creation deserves the best care possible!
Health and Dietary Considerations
Making delicious homemade ice cream doesn’t mean ignoring nutrition. Our gooey butter cake ice cream recipe can be enjoyed with some smart strategies.
When making your gooey butter cake ice cream, remember portion control. A standard serving is 1/2 to 3/4 cup. This helps manage calories while still satisfying your sweet tooth.
- Potential Allergens to Watch:
- Dairy (milk, cream, cream cheese)
- Eggs
- Wheat (in cake components)
For those with dietary restrictions, we’ve got great adaptations for our homemade ice cream:
- Lactose-Free Option: Use lactose-free milk and cream
- Gluten-Free Variation: Replace traditional cake with gluten-free cake pieces
- Lower Sugar Version: Substitute sugar with monk fruit or stevia sweeteners
Nutritional awareness can turn this decadent treat into a more balanced dessert. By choosing mindful ingredients, you can enjoy your gooey butter cake ice cream recipe without compromising your health goals!
Conclusion
We’ve looked at every step to make the ultimate homemade gooey butter cake ice cream. You now know how to make a dessert that will impress everyone. It’s all about mastering the churning technique and understanding its St. Louis roots.
This ice cream is special because you can make it your own. Every batch you make shows off your creativity and love for great desserts. Whether you’re just getting comfortable in the kitchen or you’ve been cooking for years, this recipe is a fun and easy way to try something a little different.
Remember, making this ice cream takes practice. Feel free to try new flavors and techniques. Cooking is all about exploring, learning, and sharing tasty moments with loved ones. So, get your ice cream maker ready and enjoy every bite!
Your gooey butter cake ice cream journey begins now. Happy churning!

Gooey Butter Cake Ice Cream Recipe
Short Description
This homemade Gooey Butter Cake Ice Cream transforms the classic St. Louis dessert into a creamy, dreamy frozen treat! With a rich cream cheese base, tangy buttermilk, and chunks of gooey butter cake, every bite is nostalgic and indulgent. Perfect for summer gatherings or anytime you want to impress with a unique dessert.
Recipe Details
- Serving Size: 1/2 to 3/4 cup
- Prep Time: 30 minutes
- Cook Time: 30 minutes (includes baking cake base)
- Total Time: 6-8 hours (includes chilling and freezing)
Ingredients per Serving
- 2 oz cream cheese, softened
- 1/4 cup heavy cream
- 2 tbsp buttermilk
- 1/4 tsp pure vanilla extract
- 2 tbsp granulated sugar
- 1 large egg yolk
- 2 tbsp unsalted butter, softened
- 2 tbsp powdered sugar
- 2 tbsp vanilla cake mix
- Pinch of salt
- Optional: extra cake pieces for mix-in
Nutritional Facts
- Calories: 270
- Protein: 4g
- Carbohydrates: 28g
- Fats: 16g
- Fiber: 0.5g
- Sodium: 110mg
- Sugar: 17g
Instructions
Step 1
Preheat your oven to 350°F (175°C). In a bowl, mix softened cream cheese and butter until smooth. Gradually add powdered sugar and vanilla cake mix, mixing until silky. Spread into a small baking dish and bake for 20-25 minutes until just set. Let cool, then cut into 1/2-inch cubes.
Step 2
In a medium bowl, whisk together cream cheese, granulated sugar, and egg yolk until completely smooth. Add heavy cream, buttermilk, vanilla, and a pinch of salt. Mix gently to keep the base light and creamy.
Step 3
Pour the mixture into a saucepan and cook over medium heat, stirring constantly. Heat to 170°F (77°C), or until the mixture thickens and coats the back of a spoon. Remove from heat and cool quickly in an ice bath.
Step 4
Chill the custard base in the refrigerator for at least 4 hours, or until thoroughly cold. For best results, strain the mixture to remove any lumps before chilling.
Step 5
Pour the cold custard into your ice cream maker and churn according to the manufacturer’s instructions (usually 20-25 minutes). In the last few minutes of churning, gently fold in the chilled gooey butter cake cubes.
Step 6
Transfer the ice cream to a shallow, airtight, freezer-safe container. Press a piece of plastic wrap directly onto the surface to prevent ice crystals. Freeze for at least 2-4 hours, or until firm.
Step 7
Before serving, let the ice cream sit at room temperature for 5-10 minutes to soften. Scoop and enjoy! For an extra treat, top with caramelized pecans or a drizzle of brown butter sauce.